以前、サイバートラスト様と共同でFcitx5をベースとして開発した仮想キーボードとそれに関連する開発環境を整える方法について紹介しました。
最終的にこの仮想キーボードは、Yoctoレシピを利用して組み込み機器で利用することを想定しています。 ただし、仮想キーボードの開発自体は実機がなくてもPC上で行うことができます。
今回は、PC上でWeston + WaylandをターゲットとしたFcitx5ベースの仮想キーボードの開発環境を構築する方法について紹介します。
前提条件
開発環境はUbuntu 22.04 LTSとします。 Ubuntu 24.04 LTSはターゲットとしているFcitx5のバージョンの制約により対応していません。
仮想キーボードの動作確認はWestonから起動したテキストエディタで行うものとします。
必要なソフトウェアのインストール
最初に必要な開発用のパッケージをインストールしておきます。
あらかじめソースパッケージリポジトリを有効にしておきます。
sudo sed -i"" -e "s/# deb-src/deb-src/" /etc/apt/sources.list
有効にできたら、fcitx5関連の開発パッケージをまとめてインストールします。
sudo apt update
sudo apt build-dep -y fcitx5
sudo apt install -y liblua5.3-dev itstool libboost-program-options-dev \
	 libboost-dev libboost-iostreams-dev libboost-filesystem-dev \
	 libopencc-dev libchewing3-dev libhangul-dev libcurl4-openssl-dev anthy
仮想キーボードでは複数の言語の入力に対応しています。対応言語ごとに必要なソフトウェアは次のとおりです。
- 英語
- 特に追加不要
- 日本語
- anthy, fcitx5-anthy, anthy-unicode
- 中国語(簡体字)
- fcitx5-pinyin, libime, fcitx5-lua, fcitx5-chinese-addons
- 中国語(繁体字)
- fcitx5-chewing
- 韓国語(ハングル)
- fcitx5-hangul
- ロシア語
- 特に追加不要
anthy-unicodeをインストールする
日本語入力で利用するAnthyに必要なソフトウェアとしてanthy-unicodeをインストールします。
git clone https://github.com/fujiwarat/anthy-unicode.git
cd anthy-unicode
./autogen.sh --prefix=/opt/fcitx508
make -j$(nproc)
sudo make install
fcitx5をインストールする
インプットメソッドのフレームワークであるfcitx5をインストールします。 仮想キーボードを動作させるためには追加のパッチが必要なため、clear-codeのfork版をインストールします。
git clone https://github.com/clear-code/fcitx5.git
cd fcitx5
git checkout 5.0.8+virtual-keyboard-prerequisites
cmake -B build -DCMAKE_INSTALL_PREFIX=/opt/fcitx508
make -C build -j$(nproc)
sudo make -C build install
sudo curl -o /usr/share/ECM/find-modules/FindWaylandProtocols.cmake \
	 https://raw.githubusercontent.com/KDE/extra-cmake-modules/master/find-modules/FindWaylandProtocols.cmake
libimeをインストールする
後述するfcitx5-chinese-addonsで必要なので、次の手順でlibimeをインストールします。
git clone https://github.com/fcitx/libime.git
cd libime
git submodule update --init
git checkout 1.1.1
cmake -B build -DCMAKE_INSTALL_PREFIX=/opt/fcitx508
make -C build -j$(nproc)
sudo make -C build install
fcitx5-luaをインストールする
後述するfcitx5-chinese-addonsで必要なので、次の手順でfcitx5-luaをインストールします。
git clone https://github.com/fcitx/fcitx5-lua.git
cd fcitx5-lua
git checkout 5.0.8
cmake -B build -DCMAKE_INSTALL_PREFIX=/opt/fcitx508
make -C build -j$(nproc)
sudo make -C build install
fcitx5-anthyをインストールする
仮想キーボードで日本語入力できるようにするために、fcitx5-anthyを次の手順でインストールします。
git clone https://github.com/fcitx/fcitx5-anthy.git
cd fcitx5-anthy
git checkout 5.0.8
export PKG_CONFIG_PATH=/opt/fcitx508/lib/pkgconfig
cmake -B build -DCMAKE_INSTALL_PREFIX=/opt/fcitx508
make -C build -j$(nproc)
sudo make -C build install
fcitx5-chewingをインストールする
仮想キーボードで中国語(繁体字)を入力できるようにするために、fcitx5-chewingを次の手順でインストールします。
git clone https://github.com/fcitx/fcitx5-chewing.git
ccd fcitx5-chewing
git checkout 5.0.8
cmake -B build -DCMAKE_INSTALL_PREFIX=/opt/fcitx508
make -C build -j$(nproc)
sudo make -C build install
fcitx5-hangulをインストールする
仮想キーボードでハングルを入力できるようにするために、fcitx5-hangulを次の手順でインストールします。
git clone https://github.com/fcitx/fcitx5-hangul.git
cd fcitx5-hangul
git checkout 5.0.8
cmake -B build -DCMAKE_INSTALL_PREFIX=/opt/fcitx508
make -C build -j$(nproc)
sudo make -C build install
fcitx5-chinese-addonsをインストールする
仮想キーボードで中国語(簡体字)を入力できるようにするために、fcitx5-chinese-addonsを次の手順でインストールします。
git clone https://github.com/fcitx/fcitx5-chinese-addons.git
cd fcitx5-chinese-addons
git checkout 5.0.8
cmake -B build -DCMAKE_INSTALL_PREFIX=/opt/fcitx508 \
	  -DCMAKE_PREFIX_PATH=/opt/fcitx508 -DENABLE_GUI=off
make -C build -j$(nproc)
sudo make -C build install
仮想キーボードをインストールする
git clone https://github.com/clear-code/fcitx5-virtualkeyboard-ui.git \
	--branch fcitx-5.0.8
cd fcitx5-virtualkeyboard-ui
cmake -B build -DCMAKE_INSTALL_PREFIX=/opt/fcitx508 -DENABLE_CUSTOM_LAYOUT=ON -DENABLE_WAYLAND=ON
make -C build -j$(nproc)
sudo make -C build install
Westonをインストールする
今回はWestonをターゲットとして仮想キーボードの動作確認を行うので、westonを次の手順でインストールします。
sudo apt install -y weston
westonの設定ファイルとして、~/.config/weston.iniに次のような内容を設定します。
[input-method]のpathはフルパスで指定する必要があるので、適宜環境にあわせて変更してください。
[core]
idle-time=0
xwayland=true

[keyboard]
keymap_rules=evdev
keymap_layout=jp

[output]
name=X1
mode=1920x1200

[output]
name=wayland0
mode=1920x1200

[input-method]
path=/home/kenhys/bin/fcitx5-weston.sh

[launcher]
path=/usr/bin/weston-terminal
icon=/usr/share/weston/icon_terminal.png

[launcher]
path=/usr/bin/weston-editor
icon=/usr/share/weston/icon_editor.png
そして、入力メソッドとして、ビルドしたfcitx5を使えるように ~/bin/fcitx5-weston.shを次のような内容で作成し、実行権限を付与します。
#!/bin/sh
export DISPLAY=:0
export LD_LIBRARY_PATH="/opt/fcitx508/lib:$LD_LIBRARY_PATH"
/opt/fcitx508/bin/fcitx5 --verbose "*=5"
さらに、仮想キーボードで扱える言語を設定するために、fcitx5のプロファイルを~/.config/fcitx5/profileとして次の内容で作成します。
[Groups/0]
# Group Name
Name=US
# Layout
Default Layout=us
# Default Input Method
DefaultIM=keyboard-us

[Groups/0/Items/0]
# Name
Name=keyboard-us
# Layout
Layout=

[Groups/1]
# Group Name
Name=JP
# Layout
Default Layout=us
# Default Input Method
DefaultIM=anthy

[Groups/1/Items/0]
# Name
Name=keyboard-us
# Layout
Layout=

[Groups/1/Items/1]
# Name
Name=anthy
# Layout
Layout=

[Groups/2]
# Group Name
Name=CN
# Layout
Default Layout=us
# Default Input Method
DefaultIM=pinyin

[Groups/2/Items/0]
# Name
Name=keyboard-us
# Layout
Layout=

[Groups/2/Items/1]
# Name
Name=pinyin
# Layout
Layout=

[Groups/3]
# Group Name
Name=TW
# Layout
Default Layout=us
# Default Input Method
DefaultIM=chewing

[Groups/3/Items/0]
# Name
Name=keyboard-us
# Layout
Layout=

[Groups/3/Items/1]
# Name
Name=chewing
# Layout
Layout=

[Groups/4]
# Group Name
Name=KR
# Layout
Default Layout=us
# Default Input Method
DefaultIM=hangul

[Groups/4/Items/0]
# Name
Name=keyboard-us
# Layout
Layout=

[Groups/4/Items/1]
# Name
Name=hangul
# Layout
Layout=

[Groups/5]
# Group Name
Name=RU
# Layout
Default Layout=us
# Default Input Method
DefaultIM=keyboard-ru

[Groups/5/Items/0]
# Name
Name=keyboard-ru
# Layout
Layout=

[GroupOrder]
0=US
1=JP
2=CN
3=TW
4=KR
5=RU
ここまでできたら、あとは~/bin/run-weston.shを実行し、テキストエディタ(weston-editor)のアイコンをクリックします。
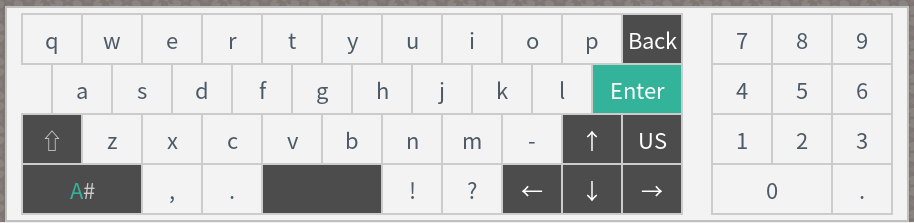
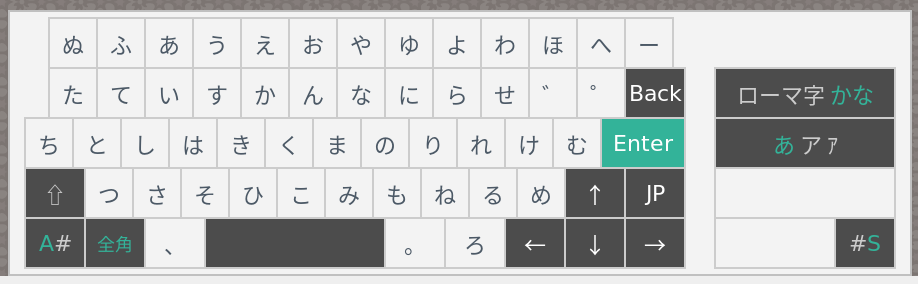
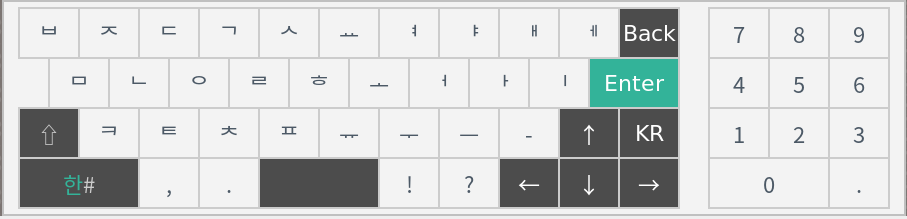
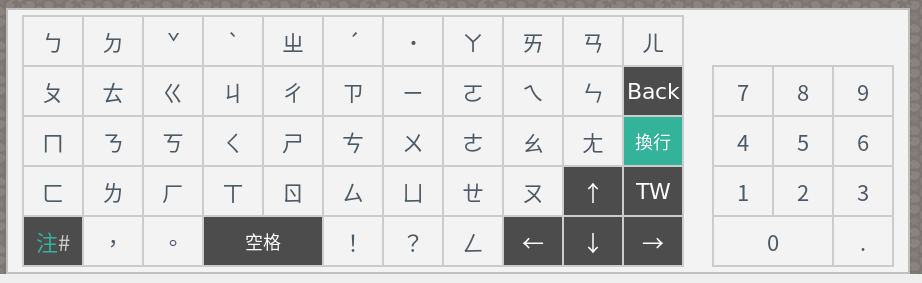
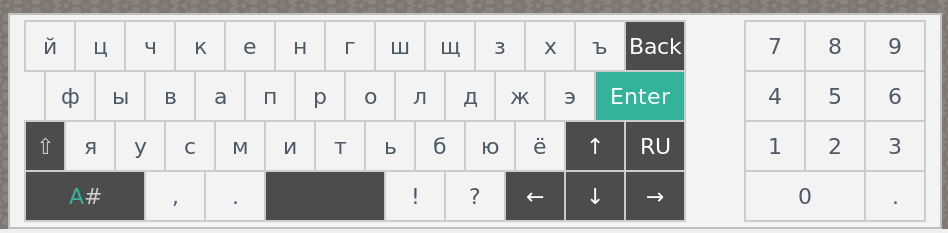
するとテキストエディタが起動し、入力フィールドにカーソルのフォーカスが移ると次のように仮想キーボードが表示されます。
設定に不備がなければ、言語切り替えキーをクリックすることで、各種言語向けキーボードに切り替えられます。
おわりに
今回は、PC上でWeston + WaylandをターゲットとしたFcitx5ベースの仮想キーボードの開発環境を構築する方法について紹介しました。
既定で対応しているのは英語、日本語、中国語(繁体字)、中国語(簡体字)、韓国語、ロシア語の6種類の仮想キーボードですが、 最近より自由に仮想キーボードのレイアウトを定義できるようにレイアウトカスタマイズ機能を実装しました。 レイアウトカスタマイズ機能は、従来C++で実装する必要のあったキーボードを、所定のJSONファイルを配置することで実現できるようにするものです。 こちらについては、別の機会に紹介したいと考えています。
クリアコードでは組み込みLinux向け多言語入力や、Webブラウザを含むアプリケーションカスタマイズに関するコンサルティングを請け負っています。 なにかお困りの点があれば、お問い合わせフォームよりお気楽にお問い合わせ下さい。